Well, sometimes you go through a two-day process, and it works, and you get some nice piccies to upload to your blog, and you feel like a very fine fellow.
But sometimes you do something that doesn't quite come off. I decided to post photos of that anyway, as the reasons why I decided not to follow this up, at least for the moment, are also part of my process (or 'prah-sesss' as they say here in Chicago.)
Over the weekend, I took one of the xeroxes of last week's Sharpie drawings, and coated it with a layer of Clear Tar Gel:

That glistening you see is the layer of gel (which stinks, by the way: if you use this stuff, make sure you have adequate ventilation or you can close it up in its own room).
I let it dry overnight, then I immersed the coated xerox for about 30 seconds in a tray of warm water:

That loosened the paper fibres (or fibers, as they say in Chicago), enabling me to do the next stage:

... which was, to flip the thing over so that the dried acrylic skin was facing down and the soaked xerox paper was facing up. Next, I began rubbing with my fingertips, and then with a rag, until the paper fibres started to loosen from the skin.
The main thing is to rub hard enough so that the paper comes loose, but not so hard that you rub away the transferred lines.
Well, I did that for about 15 minutes, until most of the fibres were rubbed away, and I was left with a piece of transparent acrylic with a drawing embedded in its surface.
And, after looking at it for a while, I thought to myself: Well, unless I'm going to colour this transfer before I glue it to the canvas, which I probably won't do, what does this process give me that I couldn't achieve just by drawing the damn image onto the canvas?
It took me two days to realise that I wasn't going to use this process. But I don't consider that it was wasted time. Sometimes you can work on something for months, before putting it aside because it doesn't work for some reason. You can only come to that point, thought, by going through the experiment in the first place.
 Subscribe to Praeterita in a reader
But sometimes you do something that doesn't quite come off. I decided to post photos of that anyway, as the reasons why I decided not to follow this up, at least for the moment, are also part of my process (or 'prah-sesss' as they say here in Chicago.)
Over the weekend, I took one of the xeroxes of last week's Sharpie drawings, and coated it with a layer of Clear Tar Gel:

That glistening you see is the layer of gel (which stinks, by the way: if you use this stuff, make sure you have adequate ventilation or you can close it up in its own room).
I let it dry overnight, then I immersed the coated xerox for about 30 seconds in a tray of warm water:
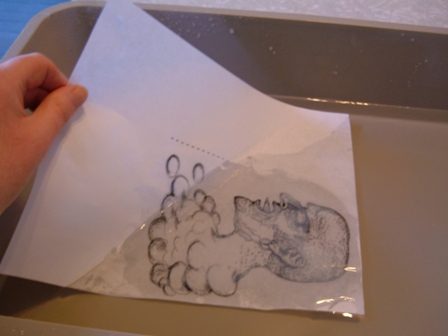
That loosened the paper fibres (or fibers, as they say in Chicago), enabling me to do the next stage:

... which was, to flip the thing over so that the dried acrylic skin was facing down and the soaked xerox paper was facing up. Next, I began rubbing with my fingertips, and then with a rag, until the paper fibres started to loosen from the skin.
The main thing is to rub hard enough so that the paper comes loose, but not so hard that you rub away the transferred lines.
Well, I did that for about 15 minutes, until most of the fibres were rubbed away, and I was left with a piece of transparent acrylic with a drawing embedded in its surface.
And, after looking at it for a while, I thought to myself: Well, unless I'm going to colour this transfer before I glue it to the canvas, which I probably won't do, what does this process give me that I couldn't achieve just by drawing the damn image onto the canvas?
It took me two days to realise that I wasn't going to use this process. But I don't consider that it was wasted time. Sometimes you can work on something for months, before putting it aside because it doesn't work for some reason. You can only come to that point, thought, by going through the experiment in the first place.
Subscribe to Praeterita in a reader